The problem
I have a synology NAS server in my home that I would like to access from external networks. Obviously the only viable option is to use HTTPS to connect to its webpage. Before 2012, getting a certificate to use for HTTPS would cost you some money. With the advent of Let’s Encrypt this became completely free of charge, but not free of complexity if you know what I mean. The good news is that synology supports Let’s Encrypt certificates out of the box. The bad news is that it supports only the HTTP-01 method for customized domains. If you happen to use the synology DDNS service (you use the synology.me domain to access your NAS) then you could use the preferred method DNS-01 but that’s not my case since I have my own domain.
The problem with the HTTP-01 method is that you need to open port 80 or 443 to your NAS in order to make it work and this is something I am not willing to do. Furthermore many ISP’s block by default those ports. I definitely prefer the DNS-01 method as you don’t need to expose any ports to the internet. With this method, you prove that you control the DNS of your domain by putting a specific value in a TXT record under that domain name. The drawback here is that in order to do that, you need to have API access from your DNS provider.
You will find more info on those methods here.
So how do you get Let’s encrypt certificates and renew them in an automated way ?
The solution
To issue and deploy the let’s encrypt certificates I use Neil Pang’s acme.sh script. It supports a multitude of DNS APIs, it’s really easy to use, it’s automated and also comes in a docker container. Throughout the years I have used many variations of the script but this is the latest and simplest so far. Please note that the script is very actively developed so it could be that it has additional features by the time you read this article.
I install the docker container of the script to have it easily maintained and to keep it separated from the rest of the Synology stuff. So make sure you have the docker package installed.
As a pre-requisite you need to have a DDNS provider (unless you have a static ip address), to be the owner of a domain and your DNS provider to be supported by acme.sh. I use FreeDNS but you can use any other provider from that list along with the relevant instructions.
I use the latest DSM 7 on synology and the acme.sh version 3.0.2
The details
New Synology admin user
We first need to create a separate admin user account that will only be used to issue / renew the certificates. You can use an existing one but I really prefer to have a separate user.
Go to Control Panel –> User & Group. Click on Create –> Create Users. Give the user a name, email address and a password at a minimum.
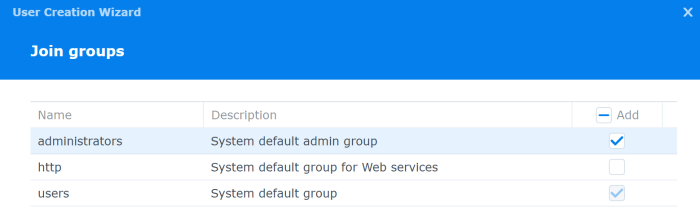
Make sure you add the user to the administrators group
Container configuration
Let’s create an acme folder in synology where we are going to store the configuration of the acme.sh container via docker volumes. This way we can change the container without losing the static configuration.
Make sure SSH is enabled on your synology and login as admin. Issue the following
mkdir /volume1/docker/acmeCreate an account.conf file that will be read by acme.sh when it issues / renews the certificates
In that file add the following
export FREEDNS_User="yourusername"
export FREEDNS_Password="yourpassword"
export SYNO_Username='yoursynologyadminuser'
export SYNO_Password='yoursynologyadminuserpassword'
export SYNO_Certificate=""
export SYNO_Scheme="https"
export SYNO_Port="5001"
export SYNO_Hostname="yoursynologyFQDN"
Note: FREEDNS_User and FREEDNS_Password use the FreeDNS API, you need to use the one that corresponds to your DNS provider here.
Note: The SYNO_Username and SYNO_Password is taken from the admin user creation above
Docker container
Now that you have the admin user and the static configuration you can download the docker image. Simply go to docker in synology and do the following
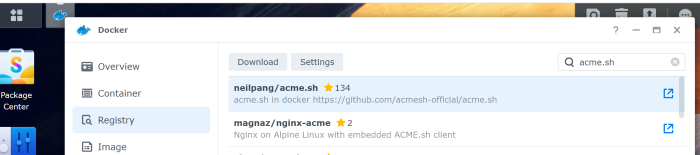
In the Registry search for Neil Pang’s acme.sh container and download it by using the latest tag. It’s pretty light as it is based on alpine linux
Then go to Image and once the image is downloaded click on Launch. Click on the Advanced Settings.
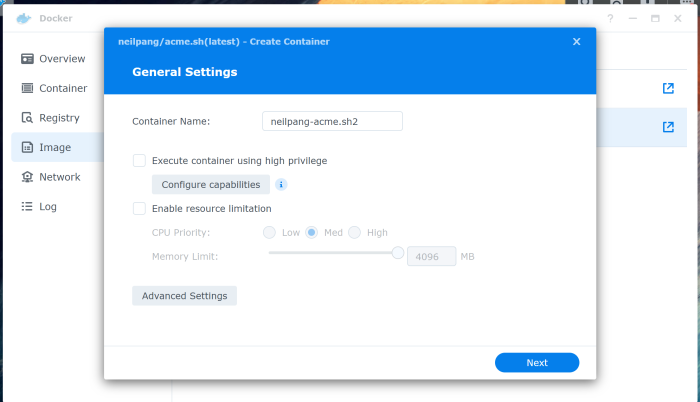
Check Enable auto-restart.
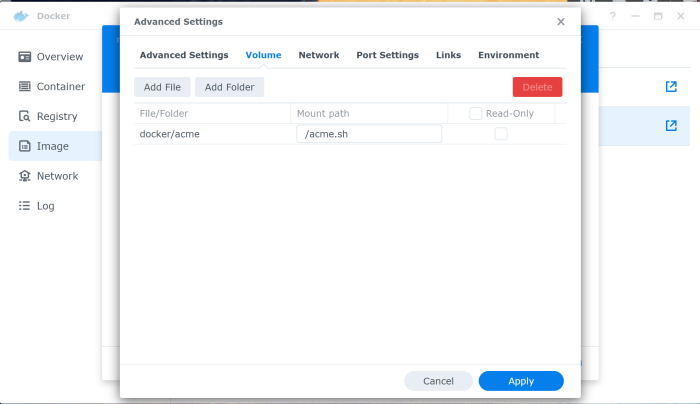
In the Volume tab click Add Folder and select the /docker/acme folder we created above. The mount path should be /acme.sh. Basically what this does is to map the acme.sh folder of the container to the /docker/acme folder we had created in Synology with the static configuration. That way, even if we delete the container and redownload it, the configuration is conserved in docker/acme.
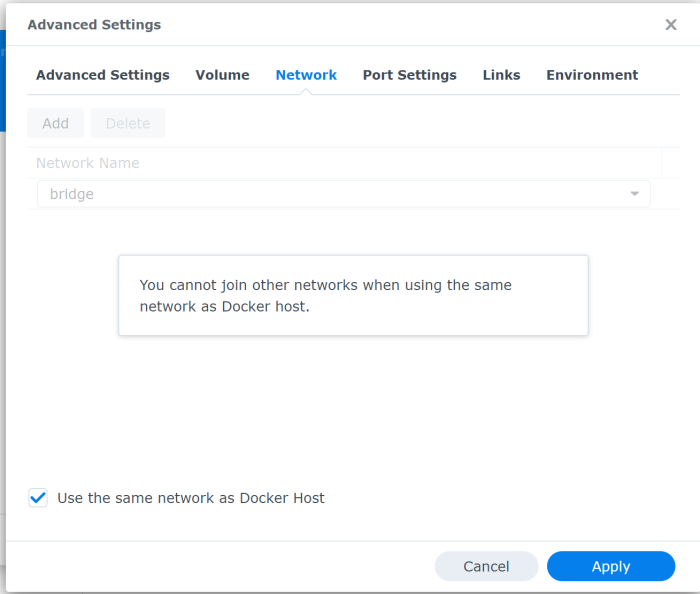
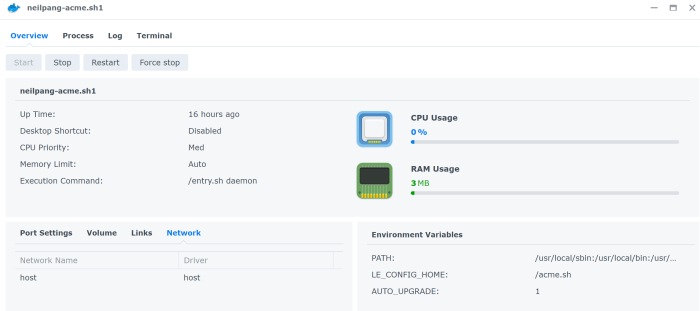
In the Network tab check the Use the same network as Docker Host. That way the container has internet access just like the Synology server has.
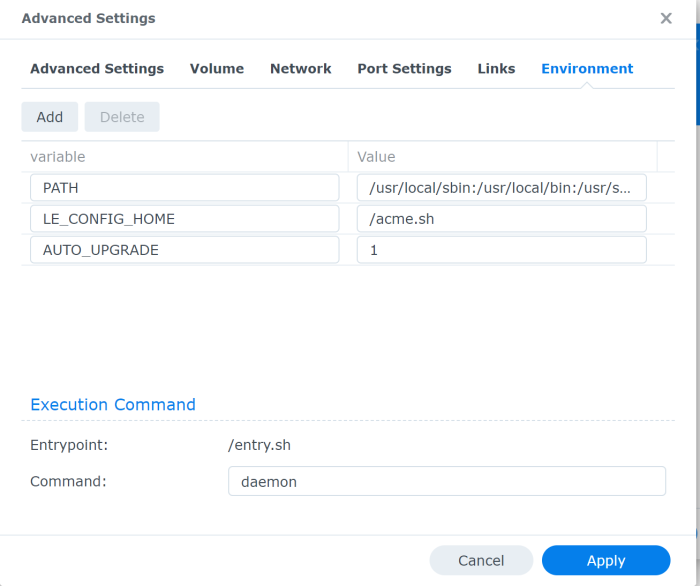
In the Environment tab type daemon in the command field. That way the container remains up as per the guidelines. The container will remain up and will take charge of the renewal of the certificate.
That’s it. Click Apply and start the container if it did not start automatically.
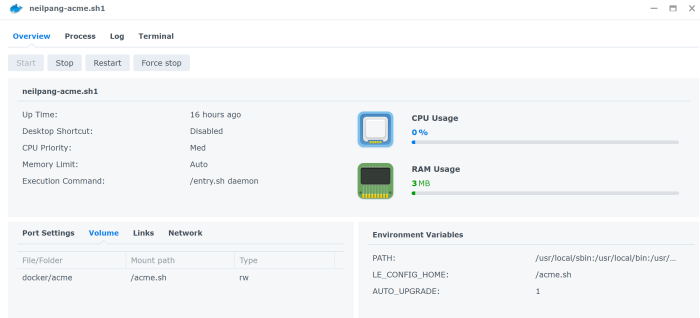
In the docker window go to Container. You should now see the acme.sh container running. Click on the details and make sure you have the same configuration as below
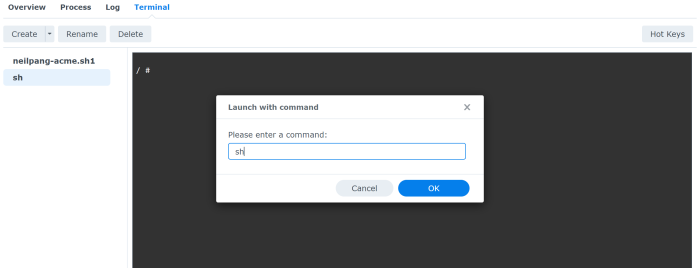
In the Terminal tab make sure you create a new terminal and put sh in the Launch with command field. You need to do that because the default bash script does not exist.
Issue and deploy let’s encrypt certificate
Now we are all set for getting those certificates. Get into the shell as I described above and issue the following command
acme.sh --set-default-ca --server letsencryptacme.sh default CA changed from Let’s Encrypt to ZeroSSL on August 2021. The above command changes the default CA back to Let’s Encrypt.
if your DNS provider is not FREEDNS you need to use the relevant dns argument as described here.
acme.sh --issue --dns dns_freedns -d yourdomainNote: Make sure you don’t make typos, the script might give you false leads if you do.
If this is completed successfully you will get the certificates downloaded to synology. In the past you had to manually transfer them to specific folders within synology in order for the the applications to pick them up successfully. Now you just need to use the synology hook provided here.
acme.sh --deploy -d yourdomain --deploy-hook synology_dsm
Et voila! Your files are moved to the right folders and the necessary services are restarted.
Next time you refresh your browser you will be using the newly generated certificate
Scheduling the renewal of the certificates
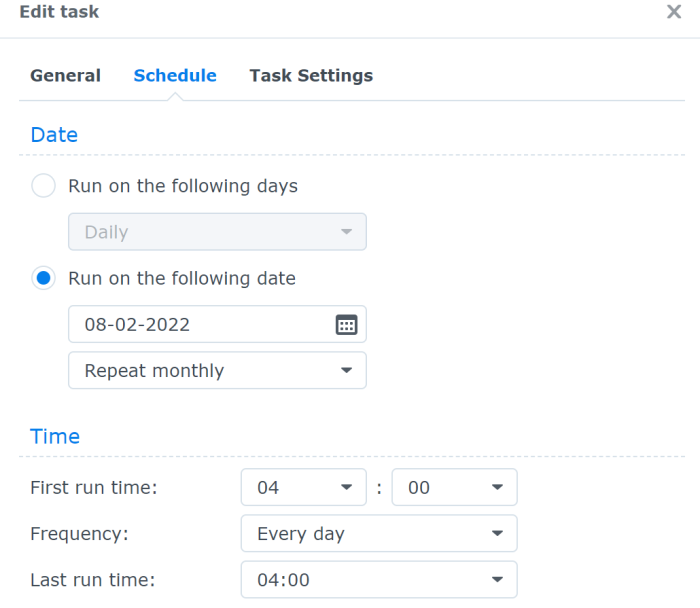
You will have to use synology’s scheduler to create a task that runs every x amount of days. Remember the certificates expire after 3 months so make sure you renew them earlier. I have create a task that runs once per month.
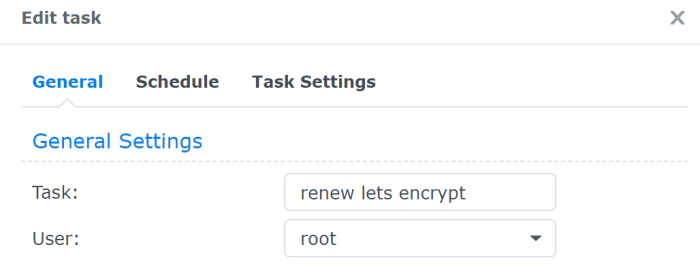
Go to Control Panel and then click on the Task Scheduler. Click on Create –> Scheduled Task –> User-defined script. In the Task give it a name and use root as the user that will execute the script. Unfortunately I tried with my admin user but I hit permissions issue so you need to use root.
In the schedule tab just define the frequency of the scheduled task. Here’s mine
In the Task Settings you add the following command in the User-defined script.
docker exec neilpang-acme.sh1 acme.sh --renew -d "yourdomain"Note: You can add –force if you just want to force the script to issue a new certificate
Additionally, you can define an email so that you are notified when the task completes.
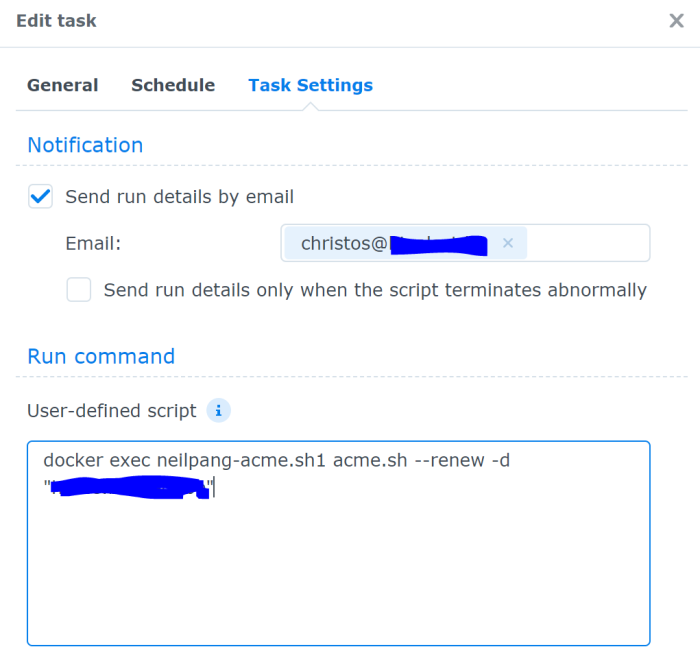
It should look like this once you finish

Tip: If the script fails for some reason re-run it, this time with the –debug flag. For example
docker exec neilpang-acme.sh1 acme.sh --renew -d "yourdomain" --debugThis will give you some tips as to what might be going wrong
Tip: If you try too many times to renew the certificate you might be blocked if you hit Let’s Encrypt rate limit.
Useful Links
acme.sh deployhook for Synology DSM
nas-forum.com post (in french)
uptrends.com for troubleshooting your NAS connectivity externally
Awesome tutorial Christos. The following tutorial will show you how to set up a user group for your Admin account so you don’t need to run your renew script as root.
https://davejansen.com/manage-docker-without-needing-sudo-on-your-synology-nas/
Thanks Ben. I hope you found it useful as this problem bothered me for a long time. Many thanks for the link, I had a look and it really makes sense. I will try to give it a shot and update the post if required
Took me a while to get it working. I found that you have to have the “Improve protection against cross-site request forgery attacks” enabled in DSM’s “control panel > security > security” in order for the deploy-hook to work.
hello Christos,
thanks for the nice tutorial.
Thanky, works really well.
I have a few remarks:
1) You should add the parameter –insecure to the deploy hook
like: acme.sh –deploy -d yourdomain –deploy-hook synology_dsm –insecure
Otherwise it will fail the first time when you do not yet have valid certificates installed. An alternative would be to use
export SYNO_Scheme=”http”
export SYNO_Port=”5000″
to update the cert without “https”.
2) You can run the renew script daily. You do not hit the rate limit a acme checks how long the certs are valid and only asks for a new cert if nessesary. You only hit the rate limit if for example you have an error in your script and you have failed queries oder you renew the cert too often with the parameter –force.
Thank you for the comment Ben.
1) I never used it honestly with the insecure argument and I always used https
2) You are right!
for a certificate without DNS verification, you can use the “–dnssleep 300” flag. thus, it is possible to have (dyn)dns shown on the server. acme.sh works without port and dns check.
the complette entry should look like this:
acme.sh –issue –dns dns_freedns -d yourdomain –dnssleep 300
read here more: https://github.com/acmesh-official/acme.sh/wiki/dnssleep
Hi.
In the past I manually ran a script every 10 weeks including updates of multiple fritzboxes and multiple synology servers with a wildcard cert (Namecheap via API).
I had problems creating the scheduled task. If someone wants to run a script file in the taskmanager, this is the script line:
docker exec DOCKERNAME sh acme.sh/YOURSCRIPT.sh
Runs perfectly. I0ve set it now to run once a month. Thank you for the documentation.
Fantastic!
#this is the script file First run must be
# acme.sh –issue –dns dns_namecheap -d *.my.domain -d my.domain -d *.my2.domain -d my2.domain -d *.my3.domain -d my3.domain
#go back to root home (started in acme.sh)
cd..
#this can also be set in account.conf
export ACCOUNT_EMAIL=’mail@my.domain’
export UPGRADE_HASH=’my_hash’
export NAMECHEAP_USERNAME=’myname’
export NAMECHEAP_API_KEY=’namechaep_api_key’
export NAMECHEAP_SOURCEIP=’Synology_official_IP’
export LOG_FILE=”/acme.sh/acme.sh.log”
export USER_PATH=’/usr/local/sbin:/usr/local/bin:/usr/sbin:/usr/bin:/sbin:/bin:/acme.sh’
#renew wildcard
acme.sh –renew –dns dns_namecheap -d *.my.domain -d my.domain -d *.my2.domain -d my2.domain -d *.my3.domain -d my3.domain
#fritz 1
export DEPLOY_FRITZBOX_URL=1.2.3.4
export DEPLOY_FRITZBOX_USERNAME=”admin1″
export DEPLOY_FRITZBOX_PASSWORD=”pass1″
acme.sh –deploy -d *.my.domain –deploy-hook fritzbox
#fritz 2
export DEPLOY_FRITZBOX_URL=1.2.3.5
export DEPLOY_FRITZBOX_USERNAME=”admin2″
export DEPLOY_FRITZBOX_PASSWORD=”pass2″
acme.sh –deploy -d *.my.domain –deploy-hook fritzbox
#fritz 3
export DEPLOY_FRITZBOX_URL=1.2.3.6
export DEPLOY_FRITZBOX_USERNAME=”admin3″
export DEPLOY_FRITZBOX_PASSWORD=”pass3″
acme.sh –deploy -d *.my.domain –deploy-hook fritzbox
#syno 1
export SYNO_Certificate=’Wildcard’
export SYNO_Username=’synoadmin’
export SYNO_Password=’password’
export SYNO_Hostname=’my.domain’
export SYNO_Scheme=’https’
export SYNO_Port=’5001′
acme.sh –deploy –home . -d “*.my.domain” –deploy-hook synology_dsm
#syno 2
export SYNO_Certificate=’Wildcard’
export SYNO_Username=’synoadmin’
export SYNO_Password=’password’
export SYNO_Hostname=’my2.domain’
export SYNO_Scheme=’https’
export SYNO_Port=’5001′
acme.sh –deploy –home . -d “*.my.domain” –deploy-hook synology_dsm
Thank you. I might give it a shot
Thanks for this useful guide! Unfortunately I get this error:
[Mon Oct 24 13:46:09 UTC 2022] Renew: ‘*.domain.net’
[Mon Oct 24 13:46:09 UTC 2022] Renew to Le_API=https://acme-v02.api.letsencrypt.org/directory
[Mon Oct 24 13:46:09 UTC 2022] Using CA: https://acme-v02.api.letsencrypt.org/directory
[Mon Oct 24 13:46:09 UTC 2022] Standalone mode.
[Mon Oct 24 13:46:09 UTC 2022] tcp 0 0 0.0.0.0:80 0.0.0.0:* LISTEN –
tcp 0 0 :::80 :::* LISTEN –
[Mon Oct 24 13:46:09 UTC 2022] tcp port 80 is already used by
80
[Mon Oct 24 13:46:09 UTC 2022] Please stop it first
[Mon Oct 24 13:46:09 UTC 2022] _on_before_issue.
Any idea what the problem is?
Hello Laurence,
Yes, you have another application running on the same box that uses port 80. That’s one reason I don’t like the HTTP-01 method. Try using the DNS-01 method if possible
You can easily install the container via: Control Panel / Task Scheduler / Create / Scheduled Task / User-defined script als root:
docker run -d –name acme.sh \
-v /volume1//docker/acme:/acme.sh \
–net=host \
–restart always \
neilpang/acme.sh:latest daemon
Before running, create a folder “acme” in /docker and then copy the account.conf into the acme folder. This can be easily done via the filestation.
Finally, the task is started and the most current image is downloaded and the conatiner is installed and started.
“export SYNO_Username” and “export SYNO_Password” are also sufficient for the standard creation of the certificate.
The variables: “export SYNO_Scheme”, “export SYNO_Hostname”, “export SYNO_Port” & “export SYNO_Certificate” are only needed if you prefer a different port, address, SSL or name as the default.
When running acme.sh –deploy -d addedmydomainhere –deploy-hook synology_dsm –insecure
I get this.
Unable to authenticate to mydomain:5001 using https.
Check your username and password.
If two-factor authentication is enabled for the user, set SYNO_TOTP_SECRET.
Error deploy for domain:mydomain
Deploy error.
Are you using two factor authentication ? I would remove 2FA at least for testing. Have you created the conf file with the correct username / password ?
Had the same problem, disabling multiple gateways under control panel -> network -> advanced settings fixed it for me. Was also unable to ping the nas via both hostname and ipv4 from the container until I disabled it, so it seems like it blocks the container from connecting to the nas. Can probably fix that with som static routes or another network interface in docker though.
Great post. Thanks for it!
I’m getting an error when trying to change the CA server:
/usr/local/bin/acme.sh: export: line 1: : bad variable name
Would you know what I’m doing wrong?
Thanks
Have you tried this ?
acme.sh --issue -d --dns dns_cf --server letsencrypt Hey Christos,
Thanks for the write up, it’s good.
I’m wondering, is there a way to do this with an account that doens’t have admin privileges? Do you know what the deploy hook actually needs admin rights for? Reason being it seems to me a bit of a security risk putting the password of this particular admin account in a plain text config file on the box and leaving it there. Not sure i’m comfortable with that.
I also don’t understand the logic of disabling access to share folders from this account because should it be compromised, it’s an admin account so they have privilege to just add read/write access to the shared folders anyway.
Thanks.
You have a point on the admin. I have quite some security measures in place but I definitely understand that having an admin account for it is not ideal. The admin user requirement comes from acme.sh script, although I don’t remember having actually tested it to confirm. I just had a look again at the acme.sh site and I see you can now enable 2FA on your admin account so this could be an additional security measure (only trust one device and ask for 2FA passcode from any other device). https://github.com/acmesh-official/acme.sh/wiki/deployhooks#20-deploy-the-cert-into-synology-dsm
Out of curiousity what kind of measures? Agian if this account is breahed, it theoretically would have access to circumvent the majority as it would just give itself rights. I know you can disable apps, IP block and all those things within DSM. 2FA isn’t also applied to SMB / mapped drives, ftp and even SSH too.
Thanks for sharing that. I did see that. Again technically not overly secure cause the cookie can be obtained from the same config file and quite easily be spoofed.
Anyhow, it’s a case of how long is a piece of string in terms of how secure you want to go vs the risk. I need to deploy these certs so likely not going to have a choice but to use an admin account it seems.
I implemented things that you have probably already guessed. IP block after 2 failed attempts, external access only from my country (otherwise via VPN), SSH is disabled and I only enable it when I want to check stuff, then I disable it again. So if somebody wants to break in, he has to do it via the GUI.
In order to get the cookie you need to first login and in order to login you will need the cookie, right ?
In any case I agree there is always a tradeoff between convenience and security. Let me know if you manage to do this without admin privileges, I’d be sleeping better if I can remove admin access as well!
I agree with you, having the admin user/pass in cleartext is far far far from ideal. Did you figure out a workaround?
Hi, thanks for your awesome guide, mine was able to get a new cert but cant deploy.
Could you shed me some light?
/ # acme.sh –deploy -d ‘xxx.xxx.com’ -d ‘xxx.xxx.com’ -d ‘xxx.xxx.com’ -d ‘xxx.xxx.com’ –deploy-hook acme –debug 2
[Mon Jan 30 05:44:29 UTC 2023] Lets find script dir.
[Mon Jan 30 05:44:29 UTC 2023] _SCRIPT_=’/usr/local/bin/acme.sh’
[Mon Jan 30 05:44:29 UTC 2023] _script=’/root/.acme.sh/acme.sh’
[Mon Jan 30 05:44:29 UTC 2023] _script_home=’/root/.acme.sh’
[Mon Jan 30 05:44:29 UTC 2023] Using default home:/root/.acme.sh
[Mon Jan 30 05:44:29 UTC 2023] Using config home:/acme.sh
[Mon Jan 30 05:44:29 UTC 2023] LE_WORKING_DIR=’/root/.acme.sh’
https://github.com/acmesh-official/acme.sh
v3.0.6
[Mon Jan 30 05:44:29 UTC 2023] Running cmd: deploy
[Mon Jan 30 05:44:29 UTC 2023] Using config home:/acme.sh
[Mon Jan 30 05:44:29 UTC 2023] default_acme_server
[Mon Jan 30 05:44:29 UTC 2023] ACME_DIRECTORY=’https://acme.zerossl.com/v2/DV90′
[Mon Jan 30 05:44:29 UTC 2023] _ACME_SERVER_HOST=’acme.zerossl.com’
[Mon Jan 30 05:44:29 UTC 2023] _ACME_SERVER_PATH=’v2/DV90′
[Mon Jan 30 05:44:29 UTC 2023] DOMAIN_PATH=’/acme.sh/xxx.xxx.com’
[Mon Jan 30 05:44:29 UTC 2023] _deployApi=’/root/.acme.sh/acme.sh’
/usr/local/bin/acme.sh: /root/.acme.sh/acme.sh: line 7974: xx.xxx.com: not found
[Mon Jan 30 05:44:29 UTC 2023] Load file /root/.acme.sh/acme.sh error. Please check your api file and try again.
[Mon Jan 30 05:44:29 UTC 2023] Deploy error.
Hello! How about trying to deploy one domain at a time and see which one causes the issue?
An ECC certificate has been downloaded for a few weeks now. If you have problems importing on devices, you can apply for an RSA certificate (old) again with -k 2048.other sizes can be 3072. 4048 or 8192, but does not need to be supported. In 2048, the size was before the changeover.
The complete command for RSA certificate looks like this:
acme.sh –issue –dns dns_freedns -d yourdomain -k 2048
or
acme.sh –issue –dns dns_freedns -d yourdomain -k 2048 –dnssleep 300
I had an issue with the Fritz!Box. The certificate was not accepted there.
You don’t need to have a task for an automatic update. Acme is already doing this on its own.
i added the task scheduler but my log shows
/usr/local/bin/acme.sh: line 7988: –renew: not found
I’m getting the same error. Did you find a solution?
Figured it out. renew needs to be called with double hyphens. The correct script command would be: docker exec neilpang-acme.sh1 acme.sh –renew -d “yourdomain”
Christos had it right in the screenshot, it was just miss-typed in the guide.
Oddly this website is auto converting double hyphens to a single hyphen, so the command I said was correct, is not actually correct after submitting my comment.
Just type out the command as Christos shows in the screenshot, don’t try to copy any paste.
I love it when people figure things out in the comments ! I changed it in the page so hopefully now you can copy / paste as expected
Ι could not refraіn from commenting. Excepti᧐nally well written!
Hey guys, hey Christos,
I followed your great tutorial. Thanks. May I ask a question regarding the scheduled renewal task?
I have also found another similar tutorial (https://blog.prabir.me/posts/wildcard-certs-auto-renewal-in-synology-nas-with-dns-challenge-via-acme-sh/) which says, that a scheduled task on the Synology NAS isn’t necessary, because when the docker container runs in daemon mode (which your tutorial also suggests), the acme-script itself takes care of the renewal task. And (maybe?) also of the deployment of the renewaled certificate. Can you confirm this?
It does seem so, because in the logs of the container I can find a nightly “cron job” running:
2023/08/05 00:44:01 stdout [Fri Aug 4 22:44:01 UTC 2023] ===End cron===
2023/08/05 00:44:01 stdout [Fri Aug 4 22:44:01 UTC 2023] Skipped mydomain.com_ecc
2023/08/05 00:44:01 stdout [Fri Aug 4 22:44:01 UTC 2023] Add ‘–force’ to force to renew.
2023/08/05 00:44:01 stdout [Fri Aug 4 22:44:01 UTC 2023] Skip, Next renewal time is: 2023-10-01T17:38:22Z
2023/08/05 00:44:01 stdout [Fri Aug 4 22:44:01 UTC 2023] Renew to Le_API=https://acme-v02.api.letsencrypt.org/directory
2023/08/05 00:44:01 stdout [Fri Aug 4 22:44:01 UTC 2023] Renew: ‘mydomain.com’
2023/08/05 00:44:01 stdout [Fri Aug 4 22:44:01 UTC 2023] ===Starting cron===
What do you think about this?
My last cert renewal failed. I have tried to manually renew and the curl command is asking for a OTP for the account that was set up. It’s never asked for this before and it’s been renewing for a while now without issues.
I suspect that it is related to the adaptive MFA that was introduced by Synology :
https://kb.synology.com/en-uk/DSM/help/DSM/AdminCenter/connection_security_account?version=7
but it isn’t enabled on my system yet. Is anyone else seeing the same issue?
I’ve tried to specifically enable 2FA for specific accounts (ignoring the one used for cert renwal but it still requests OTP to be provided. I’m not sure as to how to get around it at this point. I’m not running the latest version of the docker image at this point but wanted to see if others have had success fixing this issue by updating to the latest version before I do.
Never mind, you can ignore this. I found that the CURL was trying to use the external address to connect which it can’t so it failed. Fixed the connection to use the internal IP and this then worked first time.
Sorry for posting about the non-issue.
Can’t get this to work. I have tried so many different combinations from comments here.
Unable to authenticate check username and password
If two-factor authtentication is enabled for the user, set SYNO_Device_ID.
Two factor is not set for this user. So not sure why I can’t authenticate
Hello,
I’m also getting same error. Certificate is created and is in docker/acme folder. But deploying seems to make problems.
Tried:
acme.sh –deploy –insecure -d mydomain.com–deploy-hook synology_dsm –debug
Then I get more detailed error. It seems that Docker cant’t connect to server:
Please refer to https://curl.haxx.se/libcurl/c/lib
curl-errors.html for error code: 7
[Mon Mar 11 15:12:37 UTC 2024] Here is the curl dump log:
[Mon Mar 11 15:12:37 UTC 2024] == Info: Trying 192.168.0.109:5001…
== Info: connect to 192.168.0.109 port 5001 from 192.168.0.109 port 47624 failed:
Connection refused
== Info: Failed to connect to 192.168.0.109 port 5001 after 0 ms: Couldn’t connect to server
== Info: Closing connection
Any help would be really highly welcome 😊
Kind regards
René